The CloudCaptain Command-line Client is the CLI tool to execute the various commands.
Supported operating systems
- Windows
- Mac OSX
- Linux
Prerequisites
- CloudCaptain Account
- VirtualBox installation (for VirtualBox deployments)
- AWS Account (for AWS deployments)
Installation
- Download the latest version of the CloudCaptain Command-line client from the CloudCaptain Console
- Extract it to the directory of your choice
- Add the root directory of the extracted archive to your PATH
Authentication
By default, your download is personalized and already includes the necessary credentials to connect to your CloudCaptain Account.
You also have the option to download an unpersonalized client via the CloudCaptain Console. Credentials can then be
passed in via the user and secret configuration parameters or via the
BOXFUSE_USER and BOXFUSE_SECRET environment variables.
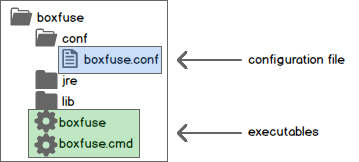
Configuration
CloudCaptain is opinionated, favors convention over configuration and comes with sensible defaults.
You can override these defaults using either configuration files or program arguments. The installation comes with a configuration file (conf/boxfuse.conf) you can edit. You also have the option to create a system-wide configuration file in your home directory (~/.boxfuse/boxfuse.conf) or a project-specific configuration file in the current directory.
Configuration Overriding Order
Higher items on the list override lower ones:
- Program arguments
- Config file as specified with
-configfile=... - <current-dir>/boxfuse-<env>.conf
- <current-dir>/boxfuse.conf
- <home-dir>/.boxfuse/boxfuse-<env>.conf
- <home-dir>/.boxfuse/boxfuse.conf
- <boxfuse-install-dir>/conf/boxfuse-<env>.conf
- <boxfuse-install-dir>/conf/boxfuse.conf
- The
BOXFUSE_USERandBOXFUSE_SECRETenvironment variables
Setting a property to an empty string with unset that property.
Note: Config files with <env> are environment-specific, for example boxfuse-prod.conf
General Options
| Name | Description |
|---|---|
| -configfile=... | Specifies the configuration file to use |
| -X | Show debug output |
| -m | Make the output of the command machine-readable (JSON) instead of plain text |
| -o | Work offline |
| -u | Upgrade to the latest CloudCaptain Client version |
| -v | Print the version and exit |
Proxy configuration
If your network requires you to use a proxy to connect to the outside world, you can tell CloudCaptain to use a proxy via the proxy option:
> boxfuse -proxy=https://myuser:mypwd@myproxyhost:1234
This can also be defined through any other configuration means described above.
Disabling TLS certificate validation
CloudCaptain always communicates via TLS (SSL). If your corporate network modifies the certificate chain to inspect traffic,
you can tell CloudCaptain not to verify TLS certificate chains via the insecure flag:
> boxfuse -insecure
This can also be defined through any other configuration means described above.
VirtualBox Networking configuration
CloudCaptain handles networking on VirtualBox differently based on the version.
By default, on VirtualBox 5.1 and above, CloudCaptain creates a separate VirtualBox NAT Network. On VirtualBox 5.0 CloudCaptain uses regular VirtualBox NAT instead.
VirtualBox 5.1+ users also have the possibility to force CloudCaptain to use regular VirtualBox NAT instead of the NAT Network
by explicitly setting the virtualbox.natnetwork CloudCaptain configuration property to false.