Get Started with CloudCaptain & Node.js
This tutorial will get you started with CloudCaptain and Node.js. It should take you about 5-10 minutes to complete.
Prerequisites
Before you begin, ensure you have successfully:
- created a CloudCaptain Account (simply log in with your GitHub account, it's free)
- downloaded and installed the latest CloudCaptain Client
- downloaded and installed the latest version of Node.js
- downloaded and installed the latest version of VirtualBox
Creating the Node.js application
In this tutorial we are going to create and deploy a simple Node.js application based on Express.
Start by installing the necessary npm packages:
> npm install -g express-generator npm-bundle
Now generate the project:
> express getstarted-nodejs
And navigate to the newly created directory:
> cd getstarted-nodejs
Then simply create the bundle tgz in the directory based on your package.json:
getstarted-nodejs> npm-bundle
Fusing a CloudCaptain image and running it locally on VirtualBox
Now it's time to fuse your application into a CloudCaptain image and launch an instance of it on VirtualBox:
getstarted-nodejs> boxfuse run
Fusing Image for getstarted-nodejs-0.0.0.tgz ...
Image fused in 00:02.481s (14809 K) -> myuser/getstarted-nodejs:0.0.0
Launching Instance of myuser/getstarted-nodejs:0.0.0 on VirtualBox ...
Forwarding http port localhost:80 -> vb-b18d6746:80
Instance launched in 00:03.139s -> vb-b18d6746
Waiting for Payload to start on Instance vb-b18d6746 ...
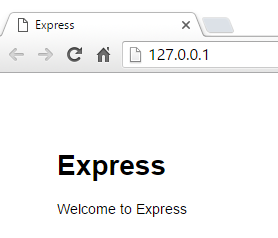
Payload started in 00:04.688s -> https://127.0.0.1
In just a few seconds CloudCaptain found your application, detected its type, generated an image for it and launched an instance of that image on VirtualBox.
Now open your browser and navigate to this address to see your new application up and running within the VirtualBox VM:
You can also see your newly created image:
getstarted-nodejs> boxfuse ls

Images available locally:
+--------------------------------+-----------------------------+-------+---------------+------------+---------+---------------------+
| Image                          |           Payload           | Debug |    Runtime    |   Ports    |  Size   |    Generated at     |
+--------------------------------+-----------------------------+-------+---------------+------------+---------+---------------------+
| myuser/getstarted-nodejs:0.0.0 | getstarted-nodejs-0.0.0.tgz | false | Node.js 5.8.0 | http -> 80 | 15076 K | 2016-03-12 14:57:50 |
+--------------------------------+-----------------------------+-------+---------------+------------+---------+---------------------+
Total: 1
As well as the instance that is running:
getstarted-nodejs> boxfuse ps

Running Instances on VirtualBox in the dev environment :
+-------------+--------------------------------+---------------------+------------------+---------------------+
|  Instance   |             Image              |        Type         |        URL       |     Launched at     |
+-------------+--------------------------------+---------------------+------------------+---------------------+
| vb-b18d6746 | myuser/getstarted-nodejs:0.0.0 | 4 CPU / 1024 MB RAM | https://127.0.0.1 | 2016-03-12 14:57:56 |
+-------------+--------------------------------+---------------------+------------------+---------------------+
Total: 1
Deploying your application to AWS
Now let's deploy the image to AWS. As CloudCaptain works with your AWS account, it first needs the necessary permissions to do so. So if you haven't already done it, go to the CloudCaptain Console and connect your AWS account now.
Every new CloudCaptain account comes with 3 environments: dev, test and prod.
dev is your local VirtualBox environment and test and prod are on AWS.
So let's deploy our application to the prod environment on AWS:
getstarted-nodejs> boxfuse run -env=prod
Creating myuser/getstarted-nodejs ...
Pushing myuser/getstarted-nodejs:0.0.0 ...
Verifying myuser/getstarted-nodejs:0.0.0 ...
Waiting for AWS to create an AMI for myuser/getstarted-nodejs:0.0.0 in eu-central-1 (this may take up to 50 seconds) ...
AMI created in 00:17.463s in eu-central-1 -> ami-d98364b6
Creating Elastic IP ...
Mapping getstartednodejs-myuser.boxfuse.io to 52.58.12.244 ...
Creating security group boxsg-myuser-prod-getstarted-nodejs-0.0.0 ...
Launching t2.micro instance of myuser/getstarted-nodejs:0.0.0 (ami-d98364b6) in prod (eu-central-1) ...
Instance launched in 00:40.942s -> i-af499712
Waiting for AWS to boot Instance i-af499712 and Payload to start at https://54.93.101.157/ ...
Payload started in 00:10.313s -> https://54.93.101.157/
Remapping Elastic IP 52.58.12.244 to i-af499712 ...
Waiting 15s for AWS to complete Elastic IP Zero Downtime transition ...
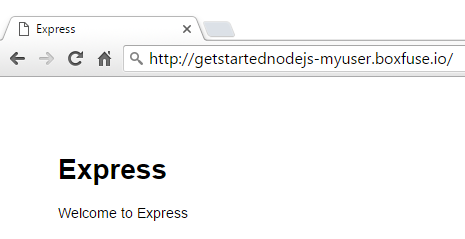
Deployment completed successfully. myuser/getstarted-nodejs:0.0.0 is up and running at https://getstartednodejs-myuser.boxfuse.io/
With that one command CloudCaptain has automatically pushed your image to the CloudCaptain Vault as well as provisioned, configured and secured all necessary AWS resources. There is no manual work necessary on your behalf.
All you need to do is simply navigate to your new domain to see your Node.js application in action on AWS:
Bonus: update your application using blue/green deployments
Now let's take things one step further and deploy an update of your application with zero downtime.
Start by modifying views/index.jade with a simple change:
extends layout

block content
  h1= title
  p Updated by CloudCaptain with zero downtime!
then bump the version in package.json:
"version": "0.0.1",
clean the old bundle:
getstarted-nodejs> del *.tgz
and rebuild the tgz:
getstarted-nodejs> npm-bundle
Finally, deploy the new version of your application to AWS:
getstarted-nodejs> boxfuse run -env=prod
Fusing Image for getstarted-nodejs-0.0.1.tgz ...
Image fused in 00:02.679s (15077 K) -> myuser/getstarted-nodejs:0.0.1
Pushing myuser/getstarted-nodejs:0.0.1 ...
Verifying myuser/getstarted-nodejs:0.0.1 ...
Waiting for AWS to create an AMI for myuser/getstarted-nodejs:0.0.1 in eu-central-1 (this may take up to 50 seconds) ...
AMI created in 00:28.465s in eu-central-1 -> ami-738b6c1c
Creating security group boxsg-myuser-prod-getstarted-nodejs-0.0.1 ...
Launching t2.micro instance of myuser/getstarted-nodejs:0.0.1 (ami-738b6c1c) in prod (eu-central-1) ...
Instance launched in 00:42.912s -> i-3649978b
Waiting for AWS to boot Instance i-3649978b and Payload to start at https://52.59.244.133/ ...
Payload started in 00:11.316s -> https://52.59.244.133/
Remapping Elastic IP 52.58.12.244 to i-3649978b ...
Waiting 15s for AWS to complete Elastic IP Zero Downtime transition ...
Terminating instance i-af499712 ...
Destroying Security Group sg-1defe174 (boxsg-myuser-prod-getstarted-nodejs-0.0.0) ...
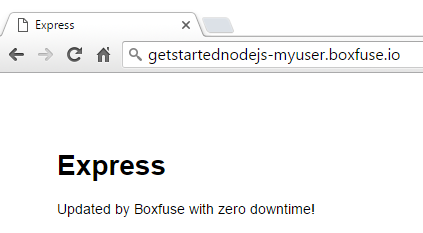
Deployment completed successfully. myuser/getstarted-nodejs:0.0.1 is up and running at https://getstartednodejs-myuser.boxfuse.io/
And there it is:
Summary
In this brief guide we have seen how to:
- create a Node.js application
- fuse it into a CloudCaptain image
- deploy the image locally on VirtualBox
- deploy the image unchanged to AWS
- update the application with zero downtime
Now it's your turn. Take your favorite Node.js application and deploy it with ease and pleasure.