Deploy Grails Apps effortlessly to AWS with Gradle
2015-12-23 by Axel Fontaine
Groovy, Grails and Gradle together form an excellent and highly productive platform for developing modern web applications.
Today we're going to look at deploying Grails applications written in Groovy effortlessly to AWS using Gradle and CloudCaptain.

We'll do so using the 3 core principles behind CloudCaptain:
| 1. | Creating servers and never modifying them again by treating a server as one immutable unit that is regenerated after every change and promoted unchanged from environment to environment. This eliminates drift and increases reliability by ensuring you run the exact same code in production as the code you tested in test. | |
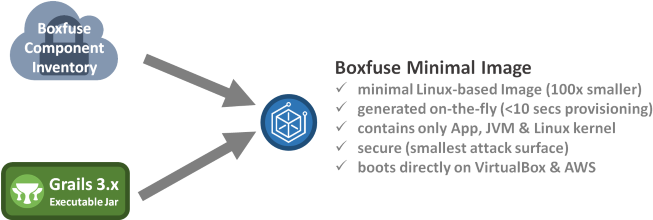
| 2. | Minimal Images | Analysing your application and generating minimal tailor-made Linux-based images on the fly that are 100x smaller than a typical Linux system and take just seconds to produce. |
| 3. | Blue/Green deployments | Deploying a new version of an app in parallel to the existing one and only making the switch at the elastic IP or elastic load balancer level once the configured health checks of the new version have passed. Deployments are fully automated and effectively transactional, providing you with zero-downtime updates. |
The plan
Our plan is to first create a new Grails app which we'll fuse into a minimal CloudCaptain image that can be deployed unchanged both on VirtualBox and AWS.
We'll then deploy our image to VirtualBox (great for rapid feedback and quick local tests), push it to the CloudCaptain Vault (our secure online repository) and run it on AWS.
And finally we'll update it on AWS with zero-downtime blue/green deployments.
Prerequisites
Before we get started ensure you have created a CloudCaptain account (it's free, just log in with your GitHub id). Also make sure to associate it with your AWS account in the CloudCaptain console to be able to deploy on EC2.
You will also need a JDK, Grails and VirtualBox installed on your machine.
Step 0: Creating a Grails application
Start by creating a Grails application:
> grails create-app getstarted-grails
Navigate to the newly created directory:
> cd getstarted-grails
And build an executable jar file:
getstarted-grails> grails war
Great. Your Grails application executable jar is now available under build/libs/getstarted-grails-0.1.jar.
Step 1: Fusing a CloudCaptain image and running it on VirtualBox
Before we can begin we first have to add the CloudCaptain Gradle plugin to our build.gradle:
plugins {
    id "com.boxfuse.client" version "1.37.0.2024"
    ...
}

boxfuse {
    // You can find these in the Downloads tab of the CloudCaptain Console (https://console.cloudcaptain.sh/#/downloads)
    user='your-boxfuse-client-user'
    secret='your-boxfuse-client-secret'
}
Now it's time to fuse your application into a CloudCaptain image and launch an instance of it on VirtualBox:
getstarted-grails> gradle boxfuseRun
This command analyses your application and generates a minimal Linux-based image for it. It does this by combining your application itself with a JRE and a Linux kernel from the CloudCaptain Component Inventory. It will then launch an instance of your new image on VirtualBox. This entire process should take around 10 seconds.
When it completes you simply open a browser pointing to your fresh new VirtualBox VM:
getstarted-grails> gradle boxfuseOpen
And here it is:
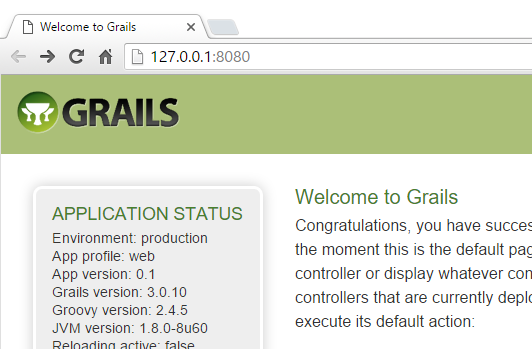
The port this instance is running on wasn't picked by chance. CloudCaptain analyses your native application.yml Grails config file
and automatically extracts the correct port and healthcheck configuration.
You can also see this information in your list of images:
getstarted-grails> gradle boxfuseLs

Images available locally:
+------------------------------+---------------------------+-------+---------+-----------+--------------+---------+---------------------+
| Image                        |          Payload          | Debug |  Java   | AppServer |    Ports     |  Size   |    Generated at     |
+------------------------------+---------------------------+-------+---------+-----------+--------------+---------+---------------------+
| myuser/getstarted-grails:0.1 | getstarted-grails-0.1.jar | false | 8.60.22 | Grails    | http -> 8080 | 97828 K | 2015-12-21 17:47:50 |
+------------------------------+---------------------------+-------+---------+-----------+--------------+---------+---------------------+
Total: 1
As well as in the list of running instances:
getstarted-grails> gradle boxfusePs

Running Instances on VirtualBox in the dev environment :
+-------------+------------------------------+---------------------+-----------------------+---------------------+
|  Instance   |            Image             |        Type         |          URL          |     Launched at     |
+-------------+------------------------------+---------------------+-----------------------+---------------------+
| vb-9feb5d7c | myuser/getstarted-grails:0.1 | 4 CPU / 1024 MB RAM | https://127.0.0.1:8080 | 2015-12-21 17:47:56 |
+-------------+------------------------------+---------------------+-----------------------+---------------------+
Total: 1
Step 2: Deploying your application to AWS
Now let's deploy your image to AWS. As CloudCaptain works with your AWS account, it first needs the necessary permissions to do so. So if you haven't already done it, go to the CloudCaptain Console and connect your AWS account now.
Every new CloudCaptain account comes with 3 environments: dev, test and prod.
dev is your local VirtualBox environment and test and prod are on AWS.
So let's deploy our application to the prod environment on AWS:
getstarted-grails> gradle boxfuseRun -Dboxfuse.env=prod -i

...
Pushing myuser/getstarted-grails:0.1 ...
Verifying myuser/getstarted-grails:0.1 ...
Waiting for AWS to create an AMI for myuser/getstarted-grails:0.1 in eu-central-1 (this may take up to 50 seconds) ...
AMI created in 00:19.095s in eu-central-1 -> ami-fd5b4491
Creating Elastic IP ...
Mapping getstartedgrails-myuser.boxfuse.io to 52.29.77.147 ...
Creating security group boxsg-myuser-prod-getstarted-grails-0.1 ...
Launching t2.micro instance of myuser/getstarted-grails:0.1 (ami-fd5b4491) in prod (eu-central-1) ...
Instance launched in 00:50.707s -> i-2c1daf90
Waiting for AWS to boot Instance i-2c1daf90 and Payload to start at https://52.59.247.126:8080/health ...
Payload started in 00:55.567s -> https://52.59.247.126:8080/health
Remapping Elastic IP 52.29.77.147 to i-2c1daf90 ...
Waiting 15s for AWS to complete Elastic IP Zero Downtime transition ...
Deployment completed successfully. myuser/getstarted-grails:0.1 is up and running at https://getstartedgrails-myuser.boxfuse.io:8080/
With that one command CloudCaptain has automatically pushed your existing image to the CloudCaptain Vault, the CloudCaptain secure only image repository, as well as provisioned, configured and secured all necessary AWS resources including a domain name, an elastic IP, a security group and your instance itself. There is no manual work necessary on your behalf.
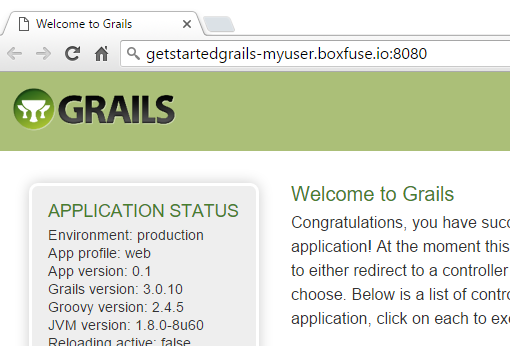
Once again CloudCaptain automatically used the port and healthcheck information extracted from your application.yml Grails configuration file.
All you need to do now is simply navigate to your new domain to see your Grails application in action on AWS:
Step 3: Updating your application using blue/green deployments
Now let's take things one step further and update your application on AWS with zero downtime using blue/green deployments.
This fits perfectly with our model of immutable infrastructure where we never update an instance in-place, and instead launch a new one to replace it. The new instance is only put into service once all healthchecks have passed and it has proven to be fit for the job. This ensures to you always have a working application up and running serving your users.
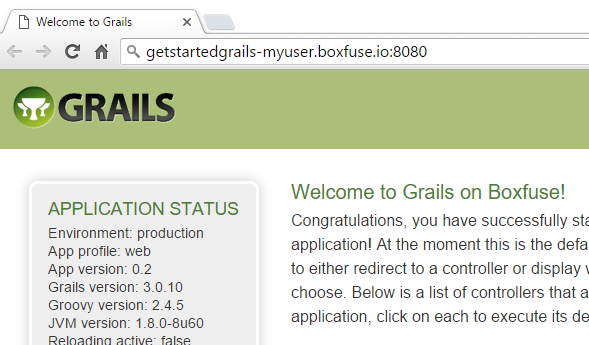
So first let's update our app by modifying grails-app/views/index.gsp and change the title:
<h1>Welcome to Grails on CloudCaptain!</h1>
then bump the version in build.gradle:
version "0.2"
and rebuild the jar and fuse a new CloudCaptain image:
getstarted-grails> grails clean
getstarted-grails> gradle boxfuseFuse -Dboxfuse.env=prod
Finally deploy the new version of your application to AWS:
getstarted-grails> gradle boxfuseRun -Dboxfuse.env=prod -i

...
Pushing myuser/getstarted-grails:0.2 ...
Verifying myuser/getstarted-grails:0.2 ...
Waiting for AWS to create an AMI for myuser/getstarted-grails:0.2 in eu-central-1 (this may take up to 50 seconds) ...
AMI created in 00:18.013s in eu-central-1 -> ami-7b5a4517
Creating security group boxsg-myuser-prod-getstarted-grails-0.2 ...
Launching t2.micro instance of myuser/getstarted-grails:0.2 (ami-7b5a4517) in prod (eu-central-1) ...
Instance launched in 00:41.174s -> i-b502b009
Waiting for AWS to boot Instance i-b502b009 and Payload to start at https://52.59.254.138:8080/health ...
Payload started in 01:27.645s -> https://52.59.254.138:8080/health
Remapping Elastic IP 52.29.77.147 to i-b502b009 ...
Waiting 15s for AWS to complete Elastic IP Zero Downtime transition ...
Terminating instance i-2c1daf90 ...
Destroying Security Group sg-5981cb30 ...
Deployment completed successfully. myuser/getstarted-grails:0.2 is up and running at https://getstartedgrails-myuser.boxfuse.io:8080/
And there it is:
Summary
In this post, we saw how to deploy and update a Grails application to AWS using Gradle and CloudCaptain in 3 easy steps. First we fused our application into a CloudCaptain minimal image and ran an instance of it on VirtualBox. We then deployed the same image unchanged to AWS. And finally we updated our application on AWS with zero downtime using blue/green deployments.
To do so we used CloudCaptain and its 3 core principles:
So if you haven't already, sign up for your CloudCaptain account now (simply log in with your GitHub id, it's free) and start deploying and auto-scaling your Groovy and Grails applications effortlessly on AWS today.