Introducing Database support
2016-01-28 by Axel Fontaine
In 2015 CloudCaptain made it dead easy to run & auto-scale JVM applications on AWS. We added special optimizations for Dropwizard, Spring Boot, Play and Grails in addition to the support for executable jars, Tomcat and TomEE (for Java EE).
While this provides a great help for tackling the complexity of the compute tier, many of our users who build microservices that follow the database per service pattern have been asking for built-in support for relational databases.

Today we are introducing dead-easy PostgreSQL database management for all environments, both locally using a new dev VM and on AWS using RDS.
What's included?
So what exactly is included in this feature? CloudCaptain is now able to provision PostgreSQL databases both locally and on AWS.
On your local machine, CloudCaptain will launch a new dev VM alongside with your application that contains a fully configured PostgreSQL database. Your applications instances will then automatically receive environment variables containing the URL, user and password required to connect to that database. And if your application is based on Spring Boot, Grails, Play or Dropwizard CloudCaptain will automatically configure your framework to use that database for its default datasource.
On AWS, CloudCaptain will automatically provision either single- or multi-AZ RDS instances for your application. You can easily scale those to different instance types or with additional storage. Just like on your local machine, your applications instances will automatically receive environment variables containing the URL, user and password required to connect to that database. And again if your application is based on Spring Boot, Grails, Play or Dropwizard CloudCaptain will automatically configure your framework to use that database for its default datasource.
Let's explore this
To give you a better impression of this new feature, we'll walk you through a simple example where we build a Spring Boot microservice that uses a geo-replicated highly available PostgreSQL database.
Prerequisites
Before we get started ensure you have created a CloudCaptain account (it's free, just log in with your GitHub id). Also make sure to associate it with your AWS account in the CloudCaptain console to be able to deploy on EC2.
You will also need a JDK and VirtualBox installed on your machine.
Step 0: Creating the Spring Boot microservice
Let's first create a basic Spring Boot application. Go to start.spring.io, select the PostgreSQL, JDBC and Web dependencies and click Generate Project:

Now unpack your project in a new directory and delete the src/test (we won't need it in this
tutorial). You should have the following structure:
 database-demo
   src
     main
       java
         boxfusedemo
           DatabaseDemoApplication.java
       resources
         static
         templates
         application.properties
     mvnw
     mvnw.cmd
     pom.xml
Change the project version in pom.xml to 1.0:
<version>1.0</version>
Next, add Flyway as a dependency to pom.xml so we can create the
database schema we'll need:
<dependency>
    <groupId>org.flywaydb</groupId>
    <artifactId>flyway-core</artifactId>
</dependency>
And create a migration as src/main/resources/db/migration/V1__Messages.sql:
CREATE TABLE messages (
  id INT NOT NULL PRIMARY KEY,
  msg TEXT NOT NULL
);

INSERT INTO messages (id, msg) VALUES (1, 'Greetings from Spring Boot auto-configured by CloudCaptain!');
Then add a simple controller to boxfusedemo.DatabaseDemoApplication:
package boxfusedemo;

import org.springframework.beans.factory.annotation.Autowired;
import org.springframework.boot.SpringApplication;
import org.springframework.boot.autoconfigure.SpringBootApplication;
import org.springframework.jdbc.core.JdbcTemplate;
import org.springframework.web.bind.annotation.RequestMapping;
import org.springframework.web.bind.annotation.RestController;

import javax.sql.DataSource;

@SpringBootApplication
@RestController
public class DatabaseDemoApplication {
    @Autowired
    private DataSource dataSource;

    @RequestMapping("/")
    public String hello() {
        return new JdbcTemplate(dataSource).queryForObject("select msg from messages where id=?", String.class, 1);
    }

    public static void main(String[] args) {
        SpringApplication.run(DatabaseDemoApplication.class, args);
    }
}
And last but not least, compile it into an executable jar file:
> mvnw package -DskipTests
Great. Your Spring Boot microservice executable jar is now available under
target/database-demo-1.0.jar.
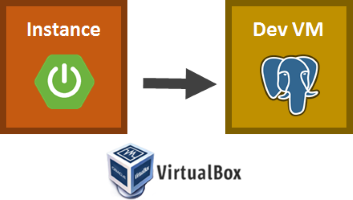
Step 1: Fusing a CloudCaptain image and running it on VirtualBox
Now it's time to fuse your application into a CloudCaptain image and launch an instance of it on VirtualBox:
> boxfuse run

Fusing Image for database-demo-1.0.jar ...
Image fused in 00:07.373s (56827 K) -> myuser/database-demo:1.0
Downloading boxfuse-dev-hdd 20160123 ...
Preparing CloudCaptain Dev VM HDD ...
Creating CloudCaptain Dev VM for myuser/database-demo ...
Exposing Dev VM PostgreSQL port on localhost:5432
Starting CloudCaptain Dev VM for myuser/database-demo ...
Launching Instance of myuser/database-demo:1.0 on VirtualBox ...
Forwarding http port localhost:8080 -> vb-db91551d:8080
Instance launched in 00:03.426s -> vb-db91551d
Waiting for Payload to start on Instance vb-db91551d ...
Payload started in 00:13.157s -> https://127.0.0.1:8080
What just happened here?
CloudCaptain detected the Maven project structure and automatically found the executable jar. CloudCaptain then determined that this is a Spring Boot application that includes the PostgreSQL driver and automatically configured it to require a PostgreSQL database. It then fused our application's executable into a minimal bootable VM image.
Before starting an instance of our image, CloudCaptain installed and launched a dev VM that contains a fully-configured PostgreSQL database. The PostgreSQL service from that VM was then exposed to our app on port 5432.
CloudCaptain then launched a VM instance of our application's image and automatically injected the correct database URL, user and password as environment variables. Those environment variables were then picked up by our Spring Boot application to instantiate and autowire the datasource required by our small rest controller.
Seeing it in action
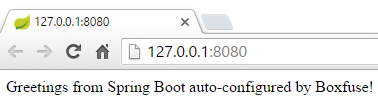
To see our controller in action, simply point your browser to https://127.0.0.1:8080 or type:
> boxfuse open
And here our service successfully returning the record from our freshly created and migrated database:
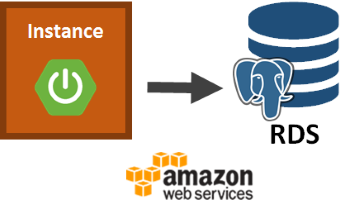
Step 2: Deploying to AWS
Now let's deploy our microservice to AWS. As CloudCaptain works with your AWS account, it first needs the necessary permissions to do so. So if you haven't already done it, go to the CloudCaptain Console and connect your AWS account now.
Every new CloudCaptain account comes with 3 environments: dev, test and prod.
dev is your local VirtualBox environment and test and prod are on AWS.
So let's deploy our microservice to the prod environment on AWS:
> boxfuse run -env=prod

Creating myuser/database-demo ...
Pushing myuser/database-demo:1.0 ...
Verifying myuser/database-demo:1.0 ...
Creating security group boxsg-db-myuser-prod-database-demo ...
Creating RDS postgresql DB (db.t2.micro / 5 GB) => boxdb-myuser-prod-database-demo (this one-time action may take up to 10 minutes to complete) ...
Waiting for AWS to create an AMI for myuser/database-demo:1.0 in eu-central-1 (this may take up to 50 seconds) ...
AMI created in 00:32.075s in eu-central-1 -> ami-9d1d05f1
Waiting for AWS to make RDS DB boxdb-myuser-prod-database-demo available ...
DB boxdb-myuser-prod-database-demo [creating]
DB boxdb-myuser-prod-database-demo [backing-up]
DB boxdb-myuser-prod-database-demo [available]
Creating Elastic IP ...
Mapping databasedemo-myuser.boxfuse.io to 52.29.173.190 ...
Creating security group boxsg-myuser-prod-database-demo-1.0 ...
Launching t2.micro instance of myuser/database-demo:1.0 (ami-9d1d05f1) in prod (eu-central-1) ...
Instance launched in 00:49.422s -> i-d671f06a
Waiting for AWS to boot Instance i-d671f06a and Payload to start at https://54.93.73.84:8080/ ...
Payload started in 00:55.276s -> https://54.93.73.84:8080/
Remapping Elastic IP 52.29.173.190 to i-d671f06a ...
Waiting 15s for AWS to complete Elastic IP Zero Downtime transition ...
Deployment completed successfully. myuser/database-demo:1.0 is up and running at https://databasedemo-myuser.boxfuse.io:8080/
What just happened here?
CloudCaptain pushed our image to the secure CloudCaptain Vault. CloudCaptain then automatically provisioned an RDS PostgreSQL database (and its associated security group). It then went on to create an AMI for our image. Once our database was ready, CloudCaptain then create a new domain name and mapped it to a new elastic ip. It then created a security group four our app and launch an instance of our AMI.
CloudCaptain automatically injected the correct database URL, user and password as environment variables. Those environment variables were then picked up by our Spring Boot application to once again instantiate and autowire the datasource required by our small rest controller.
Seeing it in action
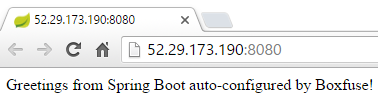
Once again, to see our controller in action, simply type:
> boxfuse open -env=prod
And here our service successfully returning the record from our freshly created and migrated database:
Step 3: Making our database highly available
Finally let's make sure our infrastructure can survive in the face of failure. To achieve that we're going to make our database highly available by provisioning a continuously replicated geo-redundant hot standby spare instance that's ready take over in case the primary one fails.
To achieve this we'll simply scale our database in the CloudCaptain Console:
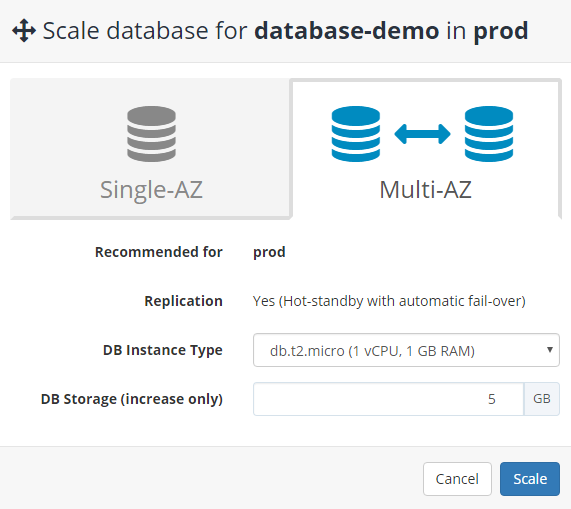
And that's it! Not only is our database now able to automatically fail-over, but we now also get near zero-downtime (typically only a few seconds) when patching or minor version upgrades are required.
Summary
In this post, we introduced CloudCaptain's new dead-easy database management capabilities.
CloudCaptain is now able to automatically provision PostgreSQL databases both locally and on AWS RDS. CloudCaptain exposes the database URL, user and password as environment variables within the application instances. And if your application is based on Spring Boot, Grails, Play or Dropwizard, CloudCaptain will automatically configure your frameworks's default datasource with those settings.
Finally making your database highly available and scaling both the instance type and the allocated storage is now a breeze. All it takes is a few clicks in the CloudCaptain Console.
So if you haven't already, sign up for your CloudCaptain account now (simply log in with your GitHub id, it's free) and start deploying your applications and their PostgreSQL databases effortlessly on AWS today.