Deploying Spring Boot Apps on EC2
2015-06-10 by Axel Fontaine
Lately the JVM-world has finally started embracing solutions that just work. Gone are the days where you had to manually wire together many components and write large amounts of XML configuration just to make things work. Today it is all about being productive from the get go. And to us this is really music to our ears. Our products (Flyway & CloudCaptain) have always adhered to this exact design principle from the start. And so regardless of whether you easily want to migrate your relational databases or fuse your applications into bootable apps, Flyway & CloudCaptain work very had to make you successful. Rapidly and reliably.
Pivotal has now gone the same way and tied their entire portfolio of Spring frameworks and libraries into a fantastic framework called Spring Boot. It is a turn-key solution to the Spring ecosystem.
At its core, Spring Boot combines your application with an embedded container and all its other libraries into a single executable jar that can easily be deployed onto any system. It adds lots of auto-configuration and integration options to make your application production-ready from day one. In fact Spring Boot even offers out of the box integration for Flyway so adopting industry best practices like database migrations has never been easier.

In this post we'll take Spring Boot's idea of executable jars to its natural conclusion: fusing your Spring Boot application together with a JVM and a kernel into a immutable bootable app that can be run unchanged on both VirtualBox and EC2.
Prerequisites
Before we get started ensure you have created a CloudCaptain account (it's free, just log in with your GitHub id). Make sure to associate it with your AWS account in the CloudCaptain console to deploy on EC2.
You will also need Java, Maven and VirtualBox installed on your machine.
Creating a Spring Boot app
Creating a new Spring Boot app is incredibly easy. The Spring Boot website provides a simple service at start.spring.io to create application skeletons directly via http. To create the application for this post, you can either click to generate the application and extract it or type this one-liner:
> curl "https://start.spring.io/starter.zip?baseDir=springbootec2&groupId=boxfusedemo&artifactId=springbootec2&version=1.0&name=springbootec2&description=Demo+project+for+Spring+Boot+on+EC2+blog+post+at+https%3A%2F%2Fcloudcaptain.sh%2Fblog%2Fspring-boot-ec2.html&packageName=springbootec2&type=maven-project&packaging=jar&javaVersion=1.8&language=java&bootVersion=1.2.4.RELEASE&style=web&style=actuator&generate-project=" > springbootec2.zip && unzip springbootec2.zip
Now change to the newly created directory and you'll find the following structure:
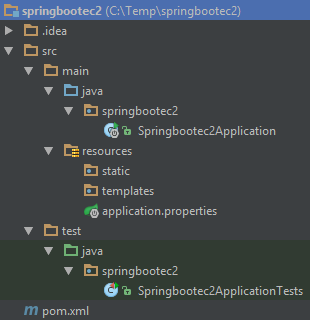
To be able to interact with the application you'll need a controller, so go ahead and create one as springbootec2.HelloController with the following contents:
package springbootec2;

import org.springframework.web.bind.annotation.RequestMapping;
import org.springframework.web.bind.annotation.RequestMethod;
import org.springframework.web.bind.annotation.RequestParam;
import org.springframework.web.bind.annotation.RestController;

import java.util.HashMap;
import java.util.Map;

@RestController
public class HelloController {
    @RequestMapping(value = "/hello", method = RequestMethod.GET)
    public Map<String, Object> hello(@RequestParam(value = "name", defaultValue = "CloudCaptain") String name) {
        Map<String, Object> result = new HashMap<>();
        result.put("greeting", "Hello " + name + "!");
        return result;
    }
}
Your application is now fully set up. As your skeleton also includes Spring Boot's actuator (their turn-key production readiness features), you now have two urls available:
/hello: your controller/health: Spring Boot's health check page
Go ahead and try it by executing
> mvn package
followed by
> java -jar target/springbootec2-1.0.jar
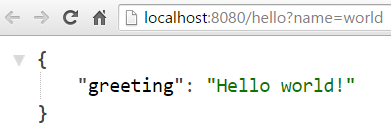
You should now be able to see it in action at https://localhost:8080/hello?name=world:
Fusing it into a CloudCaptain Bootable App
To ensure an application runs reliably on another environment, always strive to package and transport it at the lowest level possible. Spring Boot already helps you part of the way by embedding the application server and all other other libraries directly into the executable jar. This is great as it avoids the need to separately install and update an application on each individual instance. However you are still responsible for ensuring the base operating system, its libraries and the JVM are properly installed, updated and configured.
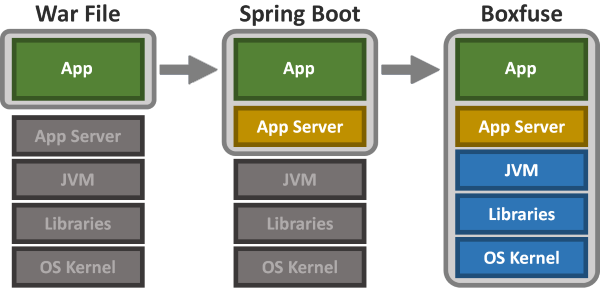
CloudCaptain starts where Spring Boot leaves off. It takes your Spring Boot executable jar and fuses it with a JVM and a Linux kernel into a single immutable unit called a Bootable App. This Bootable App is created in seconds and takes just 1% of the size of a regular system. It only contains your app and its direct dependencies. Nothing else. CloudCaptain does away with the operating system and the provisioning as you know it. Instead it analyses your application and generates a very efficient tailor-made image on the fly. This image can then be launched unchanged on VirtualBox and AWS. No intermediate OS, runtime daemon or other installation is required. It runs directly on your virtualization layer.
To fuse your Spring Boot executable jar into a CloudCaptain Bootble simply issue this command:
> boxfuse fuse target/springbootec2-1.0.jar

Fusing Image for springbootec2-1.0.jar ...
Image fused in 00:06.423s (53253 K) -> axelfontaine/springbootec2:1.0
In just a few seconds CloudCaptain took your Spring Boot executable jar (12 MB) and fused it into a 53 MB image containing a Java 8 JVM and a kernel:
> boxfuse ls

Images available locally:
+--------------------------------+-----------------------+-------+---------+-------------+------------+---------+
| Image                          |        Payload        | Debug |  Java   |  AppServer  |   Ports    |  Size   |
+--------------------------------+-----------------------+-------+---------+-------------+------------+---------+
| axelfontaine/springbootec2:1.0 | springbootec2-1.0.jar | false | 8.45.14 | Spring Boot | http -> 80 | 53253 K |
+--------------------------------+-----------------------+-------+---------+-------------+------------+---------+
Total: 1
CloudCaptain has built-in deep integration for Spring Boot applications. It automatically detects the Spring Boot actuator health check urls as well as the port configuration.
To ensure your application can configure itself correctly, CloudCaptain automatically activates a Spring profile called boxfuse on startup.
Time to see it in action. Launch your shiny new bootable app on VirtualBox with one command:
> boxfuse run springbootec2:1.0

Launching Instance of axelfontaine/springbootec2:1.0 on VirtualBox ...
Forwarding http port localhost:8888 -> vb-9b5be89b:80
Instance launched in 00:06.005s -> vb-9b5be89b
Waiting for Payload to start on Instance vb-9b5be89b ...
vb-9b5be89b => instance boot messages omitted
vb-9b5be89b => ...
vb-9b5be89b => ...
Payload started in 00:07.490s -> https://127.0.0.1:8888
Your VirtualBox instance is now up and running as you can see in your browser:

Running it unchanged on EC2
Now that you've successfully fused your Spring Boot executable jar into an image and booted it on VirtualBox,
it is time to launch an instance of it on EC2. By default CloudCaptain supports 3 environments: dev (default, VirtualBox),
test (AWS) and prod (AWS).
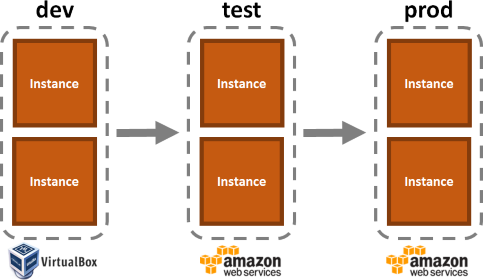
So in this case, all you need to do is switch the environment to prod:
> boxfuse run springbootec2:1.0 -env=prod

Creating axelfontaine/springbootec2 ...
Pushing axelfontaine/springbootec2:1.0 ...
Verifying axelfontaine/springbootec2:1.0 ...
Creating Elastic IP ...
Mapping springbootec2-axelfontaine.boxfuse.io to 52.28.128.122 ...
Waiting for AWS to create an AMI for axelfontaine/springbootec2:1.0 in eu-central-1 ...
AMI created in 00:31.553s -> ami-f88ab3e5
Creating security group boxfuse-sg_axelfontaine/springbootec2:1.0 ...
Launching t2.micro instance of axelfontaine/springbootec2:1.0 (ami-f88ab3e5) in eu-central-1 ...
Instance launched in 00:21.765s -> i-0ae46fcb
Waiting for Payload to start on Instance i-0ae46fcb at https://52.28.132.192/health ...
Remapping Elastic IP 52.28.128.122 to i-0ae46fcb ...
Waiting 15s for AWS to complete Elastic IP Zero Downtime transition ...
Deployment completed successfully. axelfontaine/springbootec2:1.0 is up and running at https://springbootec2-axelfontaine.boxfuse.io
And there you have it:

So what just happened here? Quite a few things! In about 60 seconds CloudCaptain
- encrypted and signed your image (springbootec2:1.0)
- uploaded it to the CloudCaptain Vault & verified the signature
- created a new AWS elastic IP (52.28.128.122)
- created a new domain name (springbootec2-axelfontaine.boxfuse.io)
- mapped the domain name to the elastic ip
- converted your image to an AMI (Amazon Machine Image)
- created an AWS security group based on the port information it detected when fusing the image
- launched a t2.micro instance based on the newly created AMI
- checked the health of your app at
/healthbased on the Spring Boot actuactor configuration - remapped the AWS elastic IP to your new instance
All of this with a single command and no additional configuration required.
You can also integrate CloudCaptain directly into your build by using either the CloudCaptain Maven Plugin or the CloudCaptain Gradle Plugin.
Summary
In this post you saw why Spring Boot is a great way to be productive from the get go with Spring. We saw that by embedding the application server and all other libraries directly into an executable jar, you gain greater consistency between environments. We then took this idea to its natural conclusion and used CloudCaptain to fuse the Spring Boot executable in a Bootable App that bundles all direct dependencies of the application all the way down to the OS kernel. The image was created in seconds and measured just a few MBs. We ran it on VirtualBox and deployed it unchanged in under 60 seconds on AWS with a single command. What you have here is the simplest and most reliable way to run your Spring Boot applications on EC2.
You can read more about CloudCaptain's first class support for Spring Boot as well as how to integrate it directly into your build with the CloudCaptain Maven & Gradle plugins. Find out more about AWS support, deploying Elastic Load Balancers and multiple instances and more in the documentation.
Have fun! And if you haven't already, sign up for your CloudCaptain account now. All you need is a GitHub user and you'll be up and running in no time. The CloudCaptain free plan aligns perfectly with the AWS free tier, so you can deploy your Spring Boot application to EC2 completely free.