Deploy a Dropwizard Unikernel to AWS
Part 1: Up and running
2015-04-25 by Axel Fontaine

Here at CloudCaptain we strongly believe in keeping things simple. We love lightweight solutions that do away with cargo cult and just work.
It turns out that when creating REST microservices Dropwizard is a perfect match for this.
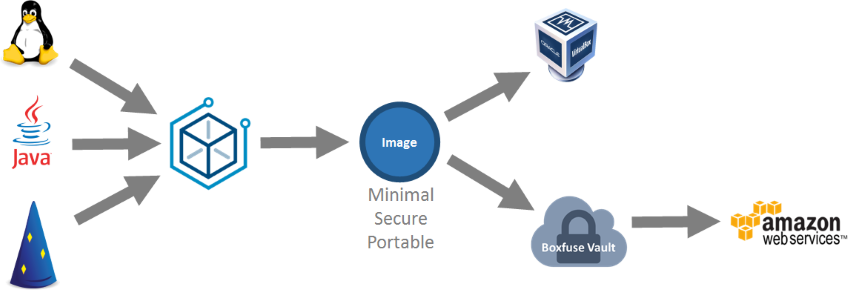
In this post we are going to look at how to fuse a Dropwizard application into a secure unikernel image. We will then test it locally on VirtualBox and finally we'll deploy it unchanged to AWS. All this in 3 easy steps.
Prerequisites
Before we get started, you will need a couple of things.
First of all you will need an AWS Account. Go ahead and register for a free AWS account now if you haven't got one already. Their free tier is great and will give you a free t2.micro (1 vCPU, 1 GB RAM) instance, a few GBs of S3 storage and much more for a whole year.
You will also need a CloudCaptain Account. If you haven't got one already, create a free CloudCaptain account now by logging in the CloudCaptain Console using your GitHub account. Once logged in, connect your AWS account with your CloudCaptain account.
Finally, ensure you have the CloudCaptain Client, Java, Maven and VirtualBox installed on your machine.
This tutorial works with Windows, Mac OSX and Linux and should take about 10 minutes to complete.
Step 0: Create a Dropwizard app
Let's begin by creating a small Dropwizard application based on the latest Dropwizard Maven archetype:
> mvn archetype:generate -DgroupId=dwunikernel -DartifactId=dwunikernel -Dversion=1.0 -Dname=DwUnikernel -Dpackage=dwunikernel -DarchetypeGroupId=io.dropwizard.archetypes -DarchetypeArtifactId=java-simple -DinteractiveMode=false
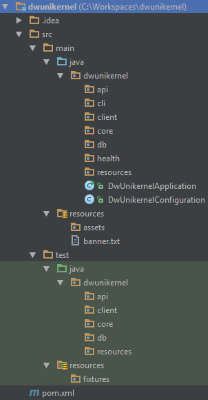
This generated the basic skeleton for Dropwizard:
Now let's add a resource and a healthcheck.
For the resource create a class named dwunikernel.resources.HelloWorldResource with the following code:
package dwunikernel.resources;

import com.google.common.base.Optional;
import javax.ws.rs.GET;
import javax.ws.rs.Path;
import javax.ws.rs.Produces;
import javax.ws.rs.QueryParam;
import javax.ws.rs.core.MediaType;
import java.util.HashMap;
import java.util.Map;

@Path("/")
@Produces(MediaType.APPLICATION_JSON)
public class HelloWorldResource {
    private final String template;

    public HelloWorldResource(String template) {
        this.template = template;
    }

    @GET
    public Map<String, Object> sayHello(@QueryParam("name") Optional<String> name) {
        Map<String, Object> result = new HashMap<>();
        result.put("hello", String.format(template, name.or("stranger")));
        return result;
    }
}
For the healthcheck, create a class named dwunikernel.health.TemplateHealthCheck:
package dwunikernel.health;

import com.codahale.metrics.health.HealthCheck;

public class TemplateHealthCheck extends HealthCheck {
    private final String template;

    public TemplateHealthCheck(String template) {
        this.template = template;
    }

    @Override
    protected Result check() throws Exception {
        final String greeting = String.format(template, "TEST");
        if (!greeting.contains("TEST")) {
            return Result.unhealthy("template doesn't include a name");
        }
        return Result.healthy();
    }
}
Finally register both the resource and the healthcheck in the dwunikernel.DwUnikernelApplication.run() method:
@Override
public void run(final DwUnikernelConfiguration configuration, final Environment environment) {
    String template = "Hello, %s!";
    environment.jersey().register(new HelloWorldResource(template));
    environment.healthChecks().register("template", new TemplateHealthCheck(template));
}
And that's it. We now have a basic Dropwizard application we can use!
Step 1: Fuse the Dropwizard app into a secure unikernel image
Log in to the CloudCaptain Console and create a new application called
dwunikernel. Select the defaults of Single Instance with Zero Downtime updates (elastic IP) and the AWS eu-central-1 region:

Now build our Dropwizard app using Maven:
> mvn package
With that done you can now turn into it a secure unikernel using the CloudCaptain Client:
> boxfuse fuse target/dwunikernel-1.0.jar

Fusing Image for dwunikernel-1.0.jar ...
Image fused in 00:07.073s (54017 K) -> axelfontaine/dwunikernel:1.0
In just over 7 seconds, CloudCaptain analysed the application, determined it was a Dropwizard application running on the JVM and automatically created the smallest possible image to run it. It also automatically set the ports and the healthcheck configuration to match that of Dropwizard.
Let's check our available images:
> boxfuse ls

Images available locally:
+------------------------------+---------------------+-------+---------+------------+--------------------------------+---------+---------------------+
| Image                        |       Payload       | Debug |  Java   | AppServer  |             Ports              |  Size   |    Generated at     |
+------------------------------+---------------------+-------+---------+------------+--------------------------------+---------+---------------------+
| axelfontaine/dwunikernel:1.0 | dwunikernel-1.0.jar | false | 8.45.14 | Dropwizard | admin-http -> 8081, http -> 80 | 54017 K | 2015-04-25 23:32:54 |
+------------------------------+---------------------+-------+---------+------------+--------------------------------+---------+---------------------+
Total: 1
Congratulations! You now a have a brand new 54 MB secure unikernel image including only our application, Java 8 and the Linux kernel!
For reference, if you would have create a minimal Ubuntu Server 15.04 VM with nothing, except SSH, openjdk-8-jre-headless and our application, this is how large the image would have been:
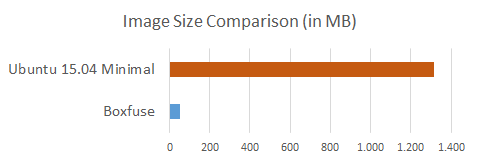
The CloudCaptain unikernel image is just 4% of the equivalent Ubuntu one. And that's just the size. When you factor in creation time, security attack surface and reproducibility we are in two different leagues.
Step 2: Test it locally on VirtualBox
Now let's launch it on VirtualBox:
> boxfuse run dwunikernel:1.0

Launching Instance of axelfontaine/dwunikernel:1.0 on VirtualBox ...
Forwarding admin-http port localhost:50001 -> vb-033da2a4:8081
Forwarding http port localhost:8888 -> vb-033da2a4:80
Instance launched in 00:04.176s -> vb-033da2a4
Waiting for Payload to start on Instance vb-033da2a4 ...
Payload started in 00:08.525s -> https://127.0.0.1:8888
Now let's check everything is up:
> curl https://localhost:8888?name=CloudCaptain
{"hello":"Hello, CloudCaptain!"}
> curl https://localhost:50001/healthcheck
{"deadlocks":{"healthy":true},"template":{"healthy":true}}

And indeed it shows up in our list of instances as well:
> boxfuse ps

Running Instances on VirtualBox :
+-------------+------------------------------+---------------------+-----------------------+---------------------+
|  Instance   |             Image            |        Type         |          URL          |     Launched at     |
+-------------+------------------------------+---------------------+-----------------------+---------------------+
| vb-033da2a4 | axelfontaine/dwunikernel:1.0 | 4 CPU / 1024 MB RAM | https://127.0.0.1:8888 | 2015-04-25 23:42:20 |
+-------------+------------------------------+---------------------+-----------------------+---------------------+
Total: 1
Step 3: Deploy it unchanged to AWS
Finally deploy the image unchanged to AWS:
> boxfuse run dwunikernel:1.0 -env=prod

Pushing axelfontaine/dwunikernel:1.0 ...
Verifying axelfontaine/dwunikernel:1.0 ...
Creating Elastic IP ...
Mapping dwunikernel-axelfontaine.boxfuse.io to 52.28.23.63 ...
Waiting for AWS to create an AMI for axelfontaine/dwunikernel:1.0 in eu-central-1 (this may take up to 50 seconds) ...
AMI created in 00:31.067s -> ami-da744bc7
Creating security group boxfuse-sg_axelfontaine/dwunikernel:1.0 ...
Launching t2.micro instance of axelfontaine/dwunikernel:1.0 (ami-da744bc7) in eu-central-1 ...
Instance launched in 00:28.320s -> i-53be0c92
Waiting for Payload to start on Instance i-53be0c92 at https://52.28.14.76:8081/healthcheck ...
Remapping Elastic IP 52.28.23.63 to i-53be0c92 ...
Waiting 15s for AWS to complete Elastic IP Zero Downtime transition ...
Deployment completed successfully. axelfontaine/dwunikernel:1.0 is up and running at https://dwunikernel-axelfontaine.boxfuse.io:8081
CloudCaptain automatically created a new Elastic IP address and a new domain. It pushed the image to the secure CloudCaptain vault, registered an AMI, created a security group and launched an instance. Then finally it mapped the Elastic IP onto the instance.
Let's check if the instance came up:
> curl https://dwunikernel-axelfontaine.boxfuse.io?name=CloudCaptainAndAWS
{"hello":"Hello, CloudCaptainAndAWS!"}
> curl https://dwunikernel-axelfontaine.boxfuse.io:8081/healthcheck
{"deadlocks":{"healthy":true},"template":{"healthy":true}}

And it did. Our Dropwizard unikernel is successfully up and running on AWS.
Done.
Congratulations! In just a few minutes and 3 easy steps you created a brand new unikernel image of the example Dropwizard application. This image is minimal, secure and portable. You ran it unchanged on both VirtualBox and AWS.
And best of all, all of this is completely free by combining the AWS and the CloudCaptain free tiers.
Now go ahead, dive deeper and read the documentation.
Continue to part 2, where we will integrate CloudCaptain directly into the Maven build.