Hello MySQL!
2016-02-12 by Axel Fontaine
In our previous post we introduced CloudCaptain's new support for managing databases. In addition to being able to quickly fuse VM images and run those unchanged locally on VirtualBox and in the Cloud on AWS, CloudCaptain now also makes it trivial to run the relational databases that those services need.
Today we are extending CloudCaptain's database support beyond PostgreSQL and adding full support for MySQL.
Additionally we are spicing up our database management with two new great features: boxfuse info and boxfuse open -db.
MySQL

No more management headaches for your MySQL databases. CloudCaptain now takes care of provisioning, starting, stopping and deleting them for you (CloudCaptain always creates a snapshot before deleting a database, so you can restore it at any time).
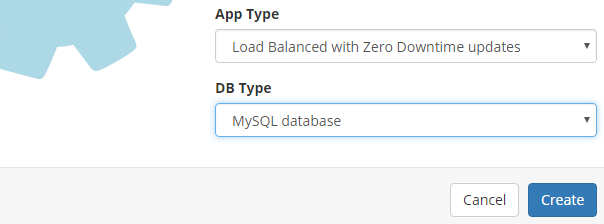
What do you need to do to enable this? You can either specify that you want a MySQL database when you create your app via your client of choice (Command-line tool, Maven plugin or Gradle plugin) or simply the CloudCaptain Console:
However in most cases you won't need to even do this. If your application includes the MySQL JDBC driver
CloudCaptain will detect it automatically for you and configure your application accordingly. If want to manage your
database yourself, this can of course be disabled by explicitly setting the database type to none
when you create your app.
CloudCaptain then automatically provisions a MySQL database for you. It does this both locally using the CloudCaptain Dev VM and on AWS using RDS.
And just like for PostgreSQL, if your application is based on Spring Boot, Grails, Play or Dropwizard, CloudCaptain will automatically configure your framework's default datasource with the correct database driver class name, URL, user and password. This works identically in every environment, both locally and on AWS.
boxfuse info
Sometimes however you also want to access your database from outside the application itself. To make it easy to get the database url, user name, password and more we are introducing a new command called boxfuse info. This command gives you all the information you need:
> boxfuse info hello -env=test

Info about myuser/hello in the test environment:

App Type    : Single Instance with Zero Downtime updates
App URL     : https://hello-test-myuser.boxfuse.io/
DB Type     : PostgreSQL database
DB URL      : jdbc:postgresql://boxdb-myuser-test-hello.ca53c5vrhrzn.eu-central-1.rds.amazonaws.com:5432/hello
DB Host     : boxdb-myuser-test-hello.ca53c5vrhrzn.eu-central-1.rds.amazonaws.com
DB Port     : 5432
DB Database : hello
DB User     : qbGh5bYandLAYiXBHXp5L8jQliU9qwAkEFRf1R7JzJJ3azNwWmauKfYJe1TCoUW
DB Password : JDBsCkFuDUCqLwDhbWZcZWmaeFCN7W8aAIzy0MjYA5ICXKCf3zMO7azw9092VFFqsnKayqWefAaklZchfATAbLsvShdsOWjKJBaU
DB Status   : available
You can then easily copy this information to configure the client of your choice.
boxfuse open -db
While being to copy this information is nice, we think not having to copy-paste anything is even better!
To be able to quickly access the database (MySQL or PostgreSQL) of your app in any environment using that database's
native client (mysql or psql) via a secure connection with the character encoring properly
set, we are introducing a new option to the open command: boxfuse open -db.
So now if you run an application on your test environment on AWS and you want to access its database (say PostgreSQL in this case) running on RDS securily via SSL, all you need to do is:
> boxfuse open hello -env=test -db

Launching psql to access the myuser/hello PostgreSQL database in the test environment ...
psql (9.4.5, Server 9.4.5)
SSL connection (Cipher: ECDHE-RSA-AES256-SHA, Bits: 256)
Type "help" for help.

hello=>\conninfo
You are connected with the database „hello“ as user „qbGh5bYandLAYiXBHXp5L8jQliU9qwAkEFRf1R7JzJJ3azNwWmauKfYJe1TCoUW“ on host „boxdb-myuser-test-hello.ca53c5vrhrzn.eu-central-1.rds.amazonaws.com“ on port „5432“.
SSL connection (Cipher: ECDHE-RSA-AES256-SHA, Bits: 256)
hello=>\q
And there you have it! You are now is a secure connection with your database using its native client. All the character encoding and RDS root certificate management is done automatically for you.
Summary
In this post, we introduced full MySQL support for CloudCaptain's dead-easy database management capabilities.
CloudCaptain now automatically detects the MySQL JDBC driver in your application and proceeds to provision MySQL databases both locally and on AWS RDS. CloudCaptain exposes the database URL, user and password as environment variables within the application instances. And if your application is based on Spring Boot, Grails, Play or Dropwizard, CloudCaptain automatically configures your framework's default datasource with those settings.
However sometimes you also want to access your database through some external tool, so we introduced boxfuse info to be able to quickly and conveniently get the information you need.
But if you want an even easier solution you can now use CloudCaptain's new boxfuse open -db switch to drop straight into a secure connection to the database of your application in that environment using your database's native client.
So if you haven't already, start deploying your applications and their databases effortlessly with CloudCaptain today. Simply log in to the CloudCaptain Console with your GitHub id, download the CloudCaptain Client and enjoy!