Deploy a Dropwizard Unikernel to AWS
Part 3: Continuous Deployment with GitHub and Travis CI
2015-05-08 by Axel Fontaine

In part 1 of this series we looked at how to fuse a Dropwizard application into a secure unikernel image. We then tested it locally on VirtualBox and finally we deployed it unchanged to AWS.
In part 2 we automated the workflow using Maven. With every automated build, we fused an image, ran integration tests against it on VirtualBox and deployed it unchanged to EC2.
Today in the final part of this series, we take this to its natural conclusion and create a full Continuous Deployment pipeline for our unikernel. Every commit flows smoothly and automatically all the way from GitHub to AWS, using Travis CI, Maven and CloudCaptain.
Prerequisites
This post assumes you have everything set up as described in part 1 and part 2.
Step 1: Setting up GitHub and Travis CI
Here at CloudCaptain we are big fans of both GitHub and Travis CI. Together they form a powerful combo of source control and continuous integration. We especially like the fact that Travis CI integrates really well with GitHub and lets you check the whole CI build job definition straight into source control. And best of all, they are both completely free for public repositories, so that is what we'll use.
So without further ado, let's get started!
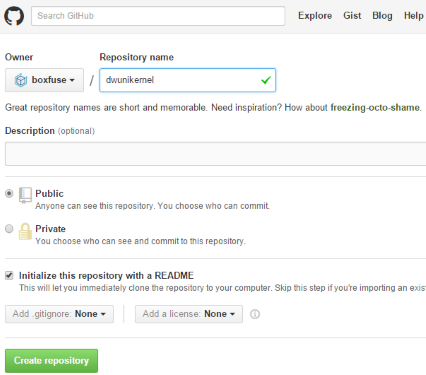
Log in to your GitHub account and create a new repository called dwunikernel:
Now head over to Travis CI and sign in with your GitHub credentials. It's easy and there is no extra registration required.
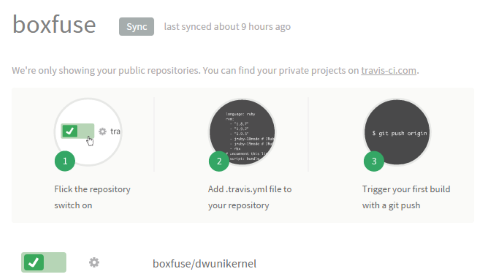
Then go to your profile, sync your repositories
and activate Travis CI for dwunikernel:
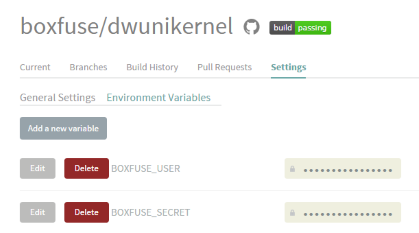
Finally, go to your Travis CI repository settings and define two secure environment variables
for your CloudCaptain credentials called
BOXFUSE_USER and BOXFUSE_SECRET. Their values are the same as the ones you enterred in
your pom.xml in part 2.
The big advantage is that they'll be securely stored at Travis CI and will not appear in neither your public GitHub repository nor your Travis CI build logs, yet the CloudCaptain Maven plugin will be able to use them.
Great! That's all we need to do on this end. Do not check in anything yet. We first need to make some changes to our app.
Step 2: Tuning the build definition
Before we can check in, some important changes must be made. This is both due to the nature of public repositories and the build environment for Travis CI.
The first and most important thing you must do is delete your CloudCaptain credentials from the pom.xml.
This is essential, because checking them in basically means giving the entire world access to your CloudCaptain account!
The next thing we need to take into account is that Travis CI does not support VirtualBox. This is important for running our integration test. We will therefore adjust the CloudCaptain Maven plugin configuration to use a test environment on AWS instead.
This is what the end result in the pom.xml looks like:
<plugin>
    <groupId>com.boxfuse.client</groupId>
    <artifactId>boxfuse-maven-plugin</artifactId>
    <version>1.37.0.2024</version>
    <!-- No more CloudCaptain credentials in the POM. -->
    <!-- Instead the BOXFUSE_USER and BOXFUSE_SECRET secure environment variables will be used. -->
    <executions>
        <execution>
            <id>fuse-image</id>
            <goals>
                <goal>fuse</goal>
            </goals>
            <phase>package</phase>
        </execution>
        <execution>
            <id>run-on-test</id>
            <goals>
                <goal>run</goal>
            </goals>
            <phase>pre-integration-test</phase>
            <configuration>
                <env>test</env>
            </configuration>
        </execution>
        <execution>
            <id>kill-on-test</id>
            <goals>
                <goal>kill</goal>
            </goals>
            <phase>post-integration-test</phase>
            <configuration>
                <env>test</env>
            </configuration>
        </execution>
        <execution>
            <id>run-on-prod</id>
            <goals>
                <goal>run</goal>
            </goals>
            <phase>deploy</phase>
            <configuration>
                <env>prod</env>
            </configuration>
        </execution>
    </executions>
</plugin>
We also want to give each unikernel we build a unique version. For this Travis CI makes a
number of interesting environment variables
available to every build. In this case we will use the TRAVIS_BUILD_NUMBER environment variable
so the version of each unikernel
image can be nicely traced back to the build that created it. On your project, you will probably want to use the
full Maven Releases on Steroids process to also tag the source control repository.
To make this possible we will give our project a generic version (0-SNAPSHOT) and replace it dynamically at the
start of every build with the Travis CI build number using the set goal of the
Maven Versions plugin.
So let's first put a generic version in our pom.xml:
<project ...

    <groupId>dwunikernel</groupId>
    <artifactId>dwunikernel</artifactId>
    <version>0-SNAPSHOT</version>
    ...
</project>
Then add the Versions plugin with the new version set to TRAVIS_BUILD_NUMBER environment variable:
<plugin>
    <groupId>org.codehaus.mojo</groupId>
    <artifactId>versions-maven-plugin</artifactId>
    <version>2.2</version>
    <configuration>
        <newVersion>${env.TRAVIS_BUILD_NUMBER}</newVersion>
    </configuration>
</plugin>
Finally, we must add a small YAML descriptor called .travis.yml to the root of our project to tell
Travis CI how to build it:
language: java
jdk: oraclejdk8
install: mvn versions:set
script: mvn deploy
This tells Travis CI to use Java 8 and first set the version, then build, test and deploy the project.
And that's all! We are all set to fire this thing up!
Step 3: Commit, push, sit back and enjoy the show!
We are now ready. Clone your new dwunikernel GitHub repository, add all the code we created, commit and push.
All the gears will now kick into motion:
- GitHub will notify Travis CI of the push
- Travis CI will create a fresh build worker, check out the sources and start Maven
- Maven will run once to set the version to match the build number
- Maven will then run again to compile and package the code as an executable Jar
- CloudCaptain will fuse that Jar into a unikernel image
- CloudCaptain will then launch an instance of that image in a test environment on AWS
- Maven will execute integration tests against that instance
- CloudCaptain will terminate the instance
- Maven will verify the test results
- And finally if everything went well, CloudCaptain will update our production environment on AWS with zero downtime
And you now get all of this fully automatically after every commit!
That includes spinning up a new Travis CI worker, Maven downloading the internet, CloudCaptain fusing the unikernel image, creating an AMI, launching 2 new instance on AWS, successfully running integration tests against one of them AND performing a clean blue/green zero downtime update with the other.
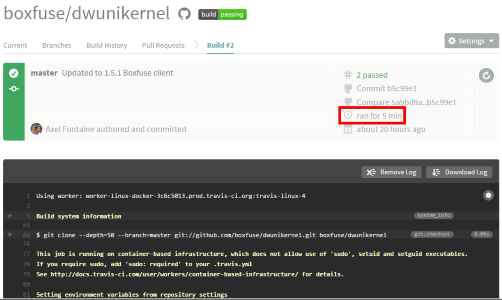
As you can see the entire process takes just 5 minutes from GitHub commit to being live on AWS.
Summary
Congratulations! You now have a fully automated Continuous Deployment pipeline for Dropwizard unikernels.
It races from GitHub to AWS in 5 minutes, including the automated image build, deployment and the integration tests against the exact same image you run in production.
It is fully automated. It is reliable. It is secure. And it's fast.
And best of all, it's completely free!
So say goodbye to snowflake servers and unreliable infrastructure.
Create your
CloudCaptain account now to get started with fast and reliable
dropwizard unikernels on AWS.
You can find the repository we used on GitHub and the build jobs for this article on Travis CI.
Learn more:
Stay tuned for much more exciting news, subscribe to this blog and follow CloudCaptain on Twitter